Image Converter
Image Converter turns a picture into a solid part. It traces the shapes in the image into a 2D outline, smooths that outline, and extrudes it to a height you choose – so a logo becomes a raised solid with the logo’s silhouette, not a relief carved from brightness.
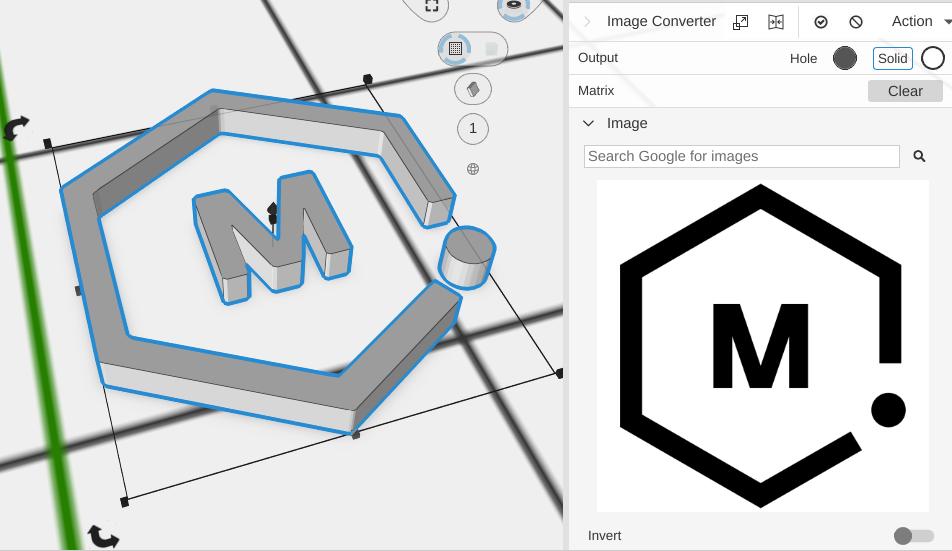
It is a component built from parts you could assemble yourself: an Image, an Image to Path that traces it, a Smooth Path, and a Linear Extrude named Main Extrude. Alongside that sits a second stack – a Border Path around the same traced shape, extruded as Base Extrude – so you can add a plate under the shape without building one. An Align holds the two together, keeping the base tucked under the main extrude.
The component surfaces just the controls you normally need. Everything else is still there in the design tree if you want it.
How to Use
There are two ways in:
- From the library. Open the 3D Primitives folder (in the Library, or under Add to Bed) and add Image Converter to the bed. It arrives with a placeholder image you then replace.
- From an image already in the scene. Select an Image and choose Image Converter from the Image group of the toolbar. The operation is only enabled when the selected item is an image.
Then:
- Set the image (see below) if you did not start from one
- Pick the Analysis Type that separates your subject from its background
- Drag the Select Range histogram handles until only the shapes you want are traced
- Set the Height under Main Extrude
Parameters
The image
- Open new image - Replaces the picture the whole stack is built from. The trace, the smoothing, the extrude and the base all rebuild from the new image
- Image Search - Searches Google for an image to use. Make sure you have permission to use anything you find
Analysis Type
Chooses how the tracer decides which pixels are part of the shape:
- Transparency - Uses the image’s own alpha channel. Transparent pixels are ignored and only opaque pixels count as the shape. Best for a PNG cut out with a transparent background
- Colors - Separates the shape by colour
- Intensity - Separates the shape by brightness. This is the default and the right choice for most photographs and black-on-white logos
The panel shows a short message under the tabs explaining what the chosen type is doing.
Select Range
The histogram is where you decide how much of the image becomes shape. Drag its handles to move the threshold; the preview image above it updates so you can see exactly which pixels are being kept before the mesh rebuilds.
- Min Surface Area - The smallest area a traced loop must have to be kept (default 1). Raise it to drop specks, dust and JPEG noise that would otherwise each become a tiny island of plastic
Main Extrude
This is a plain Linear Extrude around the traced shape:
- Height - How tall the shape stands (default 5mm)
- Bevel Top / Bevel Bottom - Round or cut the top or bottom edge of the extrusion, with their own Style, Radius and Segments
Border (the base)
A base is off until you ask for one. The Base Type tabs choose its shape:
- None - No base is created. This is what a new Image Converter starts as, and the panel says so
- Rectangle - A rectangular plate around the shape, with Radius and Segments to round its corners
- Circle - A round plate, with Centering choosing whether it is centred on the shape’s bounding box (Bounds) or on where the shape’s area actually sits (Weighted)
- Outline - A plate that follows the shape’s own outline, with Style choosing how the offset corners are made and Infill Amount closing gaps between nearby parts of the shape
Once a base type is chosen, one more control appears:
- Expand - How far the base grows past the traced shape (default 3mm). This is the visible margin around your part
Base Extrude
The height controls for the base. They only appear once Base Type is something other than None – with no base there is nothing to give height to.
- Height - How thick the base plate is
- Bevel Top / Bevel Bottom - The same bevel controls as the main extrude, applied to the plate
Tips
- High-contrast images with clear silhouettes trace best. A busy photograph traces into hundreds of loops
- If the result has speckles, raise Min Surface Area before fiddling with the histogram – it is usually noise, not threshold
- The base is aligned under the main extrude automatically. Give the base a small Height and a modest Expand for a stable part
- Removing an Image Converter (Cancel on the component) leaves the original Image behind, not a pile of loose operations, so you can start over from the same picture
- Only the controls the component surfaces are shown by default. To reach the rest – the Smooth Path settings, for example – expand the component in the design tree
When to use something else
- If you only want the traced outline as a 2D path to feed into your own operations, use Image to Path directly
- If you do want brightness to become height – a backlit picture with light and dark shading – use Lithophane. That is the height-map tool; Image Converter is not
Related
- Image to Path - The trace on its own, without the extrude and base
- Lithophane - Turn brightness into thickness for a backlit image
- Image Object - The image itself, which every image operation reads from
- Linear Extrude - The operation that gives the traced path its height
- Border Path - The operation that builds the base outline
- Components - How a component like this surfaces a chosen set of controls